
Sources
Per-project reference material (PDFs, URLs, YouTube transcripts, and text) that Chaptora's AI grounds its suggestions in. Managed from the Library sidebar.
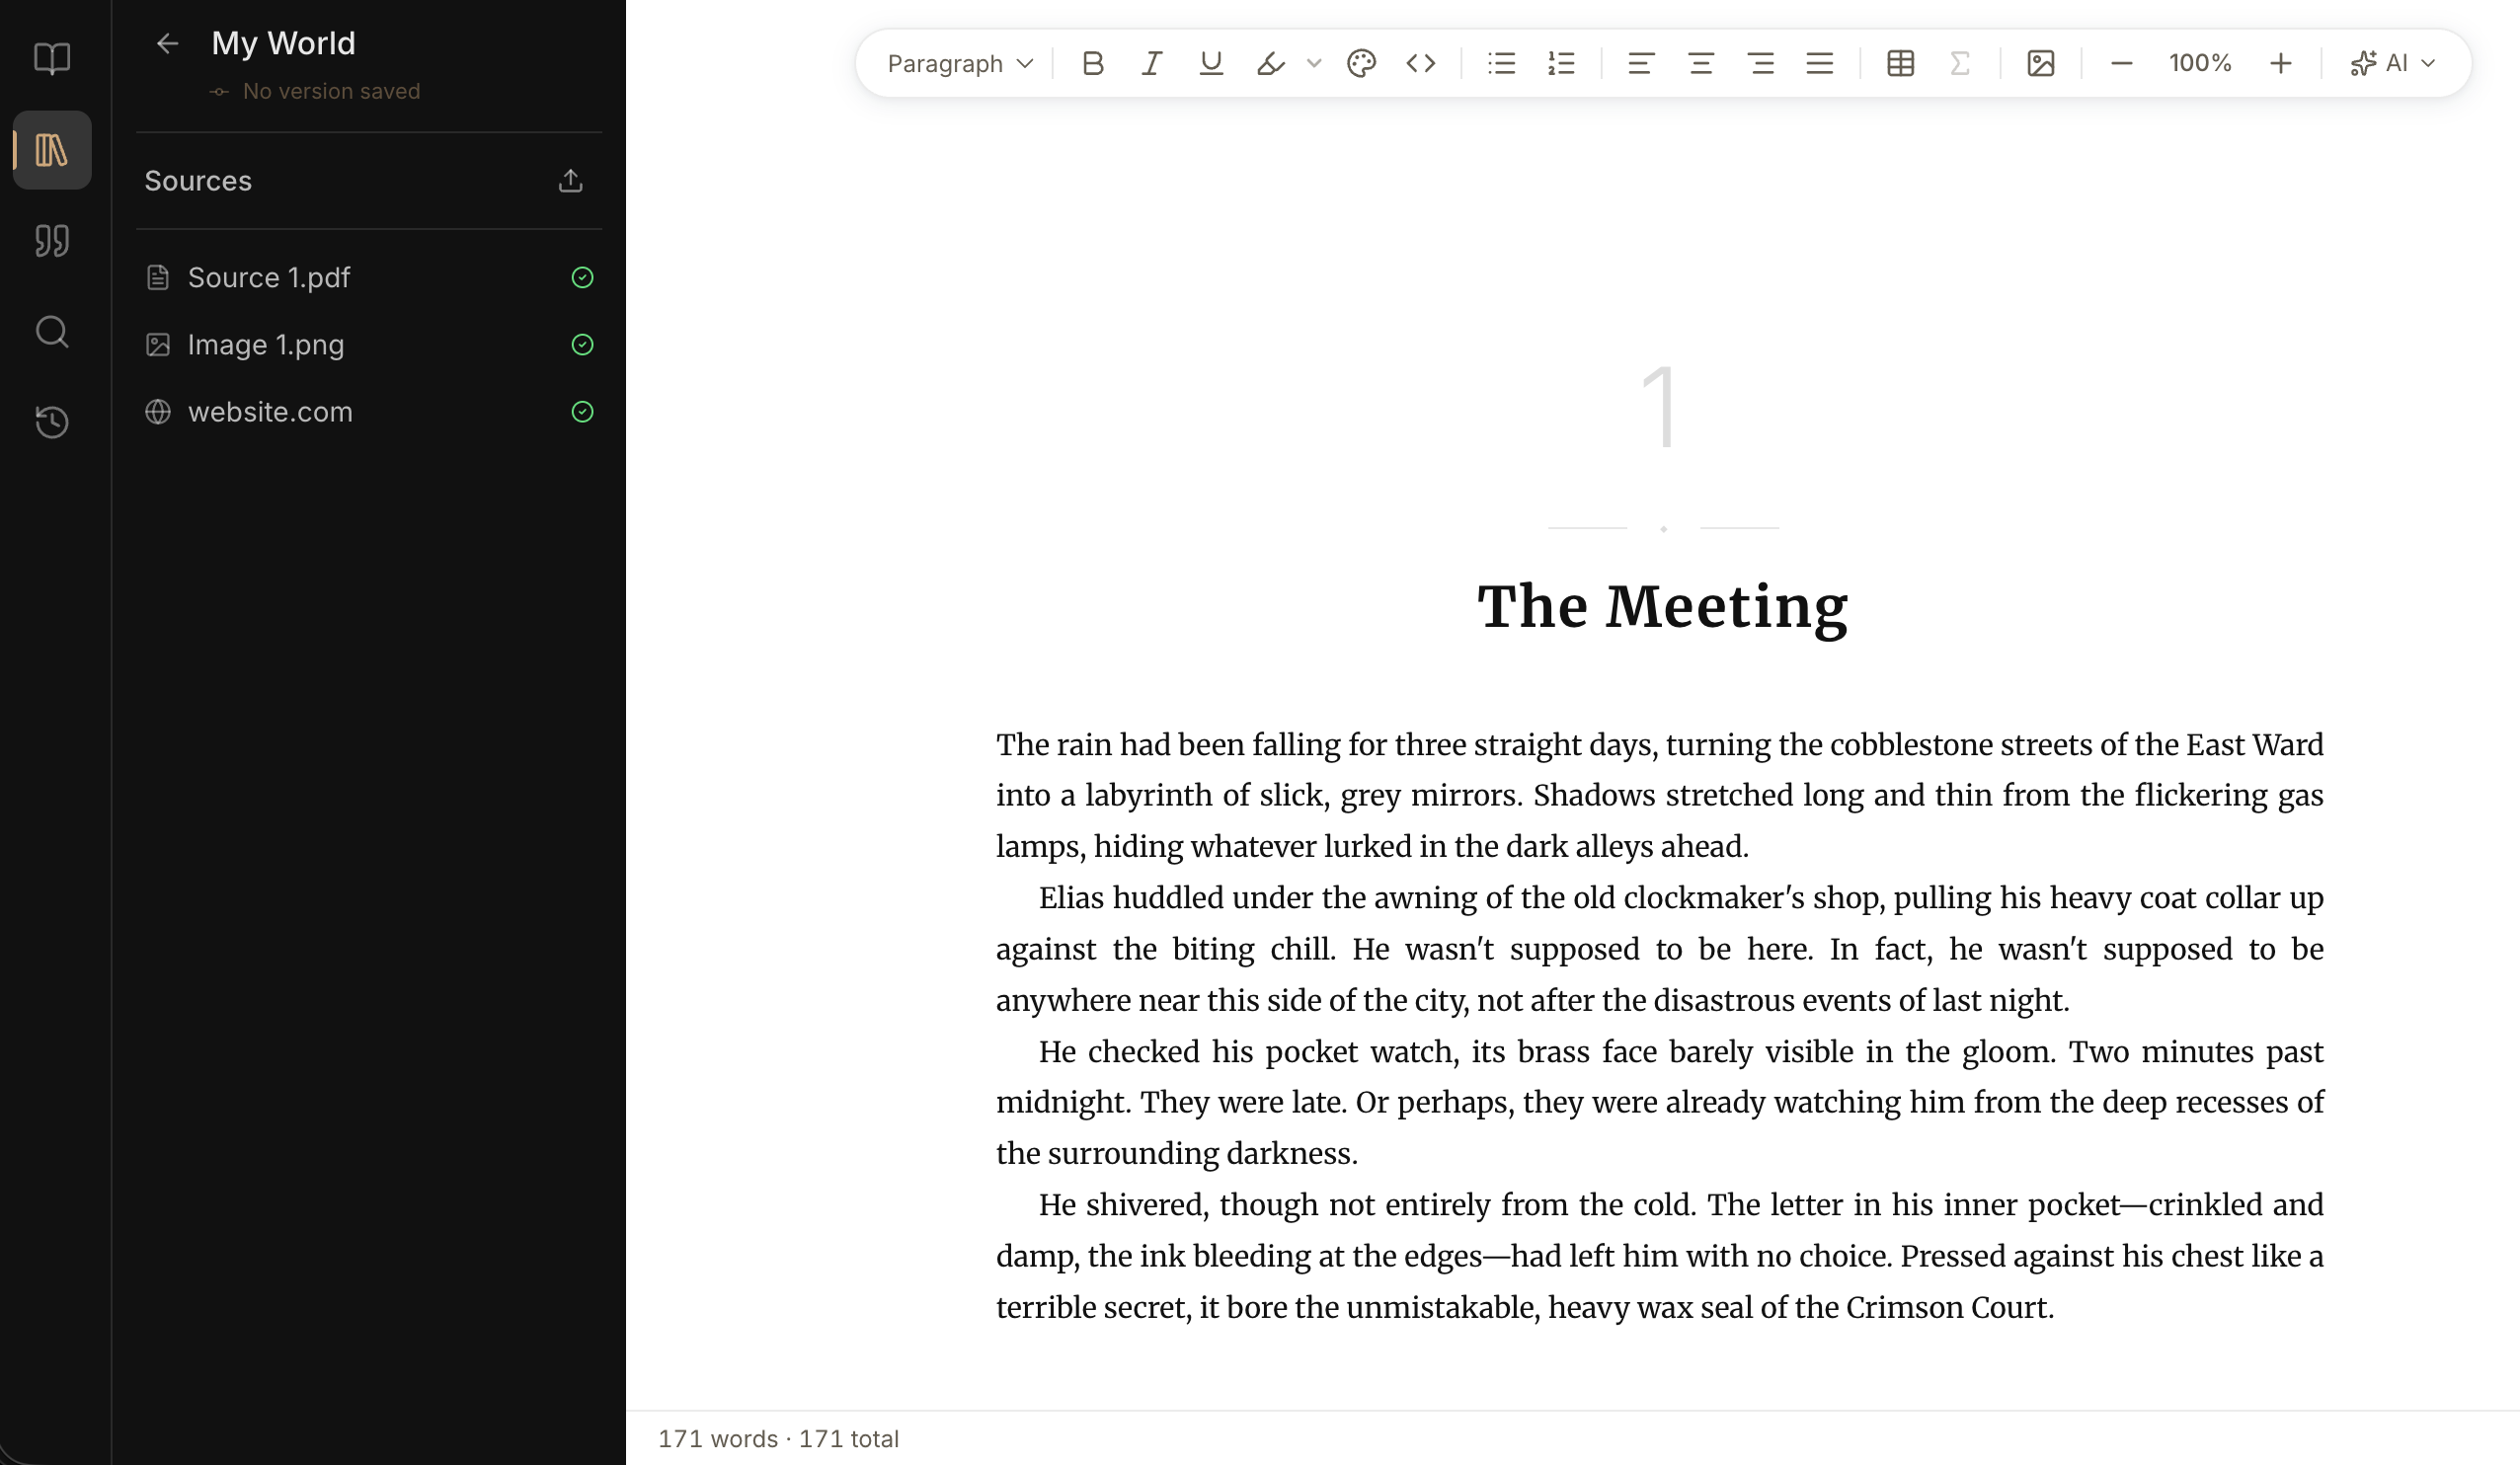
How it works#
Sources are research and reference material for your book. Add them to a Project so Chaptora's AI can find relevant details, answer questions about them, and help you write with better context.
You manage Sources in the Library. Click the Library icon in the activity bar to open the Sources sidebar. Each card shows the Source type, its progress, and a ⋯ menu for common actions.
Supported types#
| Type | What Chaptora reads |
|---|---|
| Text from the document | |
| Word (.doc, .docx) | Text from the document |
| Excel (.xls, .xlsx) | Text and values from cells |
| Markdown (.md) | The document text |
| Website | A snapshot of the page text |
| YouTube | The video transcript |
| Image (.png, .jpg, .jpeg) | The image itself |
| Plain Text | Text you paste into Chaptora |
| Chat | A research note distilled from an AI Sidebar conversation |
Add a Source#
Click the upload icon in the top right of the Sources sidebar. The Add Source dialog has three tabs.
File#
- Stay on the File tab.
- Drag files into the drop zone, or click to browse.
- Click Add Source.
You can also drag supported files anywhere over the Sources sidebar to upload them immediately. The empty sidebar invites you to drop your first files there.
URL#
- Click the URL tab.
- Paste a website or YouTube URL.
- Click Add Source.
For a website, Chaptora saves the page text. For YouTube, it reads the available transcript.
Text#
- Click the Text tab.
- Give the Source a title and paste your content.
- Click Add Source.
Use Plain Text for research notes, interview excerpts, or anything you've already written elsewhere.
Chat conversation#
A Chat Source is not added through the dialog — you save it straight from the AI Sidebar. This is useful when a conversation turns into real research: you've explored a topic with the AI, settled some facts, and want to keep the findings with your other Sources.
- Open the AI Sidebar and finish the part of the conversation you want to keep.
- Click the bookmark icon at the top of the sidebar.
Chaptora saves the whole conversation up to its latest message and distills it into a structured research note — the findings, facts, decisions, and open questions, without the small talk. The note is what the AI searches later; the full conversation stays attached so you can always look up the original exchange.
A few things to know:
- Each save is a snapshot. The Source never changes afterwards, even as the conversation continues.
- The bookmark is disabled while there is nothing new to save. Once you exchange more messages, it lights up again — saving then creates a new Source covering the whole conversation, not an update of the earlier one.
- Writing the research note uses a small amount of your monthly AI allowance.
Watch the progress#
New Sources move through a few visible steps:
- Uploaded ✓ · waiting… means the Source is waiting its turn.
- Reading & indexing means Chaptora is preparing the content for search.
- Creating summary means the Source is already readable and Chaptora is writing its guide. An animated bar shows that work is continuing.
- A green check means the Source is ready to open and use.
If Chaptora cannot read a file, page, or transcript, the card explains what happened and offers Retry when the original is still available.
AI summaries and Overview#
After Chaptora reads a text-bearing Source, it automatically creates a short summary, topic tags, and a suggested title. Topic tags appear on the card. Open that Source and its card also shows the summary. The suggested title helps pre-fill a citation draft; it does not rename your Source.
PDF, Word, Excel, website, and YouTube Sources also receive an AI Overview. It organizes the main ideas and suggests 3–5 questions you might ask. Click a topic or suggested question to place a prompt in the AI Sidebar. You can edit it before sending.
Plain Text, Markdown, and Chat Sources keep the shorter summary and topic guide without an AI Overview — a Chat Source's research note already plays that role. Images do not receive an automatic summary or Overview.
Open the Source viewer#
Click any ready Source to open the Source viewer beside the editor. It is a slide-over panel, so you can keep reading and editing your chapter while the Source stays open.
Choose Open in editor for a full-width reader. Choose Back to chapter or press Escape to return.
| Source type | What the viewer shows |
|---|---|
| The side panel shows the AI Overview and collapsible extracted text; the full-width reader shows the Overview and PDF | |
| Word | AI Overview and collapsible extracted text |
| Excel | AI Overview and collapsible extracted data |
| Website | AI Overview and collapsible page text |
| YouTube | The video player, AI Overview, and a collapsible transcript |
| Plain Text / Markdown | The complete text in the reader, without an AI Overview |
| Chat | The distilled research note in the reader, with the full conversation in a collapsible section below |
| Image | The image displayed inline |
Use Open original or Download when you need the original material. PDFs and images can open in your browser and download. Word and Excel files download. Websites and YouTube videos open at their original link.
Work with text in the viewer#
Select text in the reader or in an expanded text section. A small action bar appears:
- Insert into chapter adds the selection at your current cursor as plain text. If no chapter is open, the action tells you to open one first.
- Ask in chat quotes the selection in the AI Sidebar. It prepares the message but does not send it, so you can add your question first.
The viewer also offers Use as citation source. This opens a citation-source draft with a sensible type and title already filled in. Review the details before saving, then insert citations as usual. Learn more in Citations.
Use Sources with the AI#
To ask about a specific Source, open the ⋯ menu on its card and choose Chat with Source. The AI Sidebar opens with that Source attached to your next message. You can do the same from Add context above the AI Sidebar composer.
Chaptora's AI can also search your ready Sources when it needs supporting material. After an answer draws on Sources, Used Sources chips appear below the reply. Click a chip to open that Source in the viewer. See AI Sidebar for more about chats and context.
Manage Sources#
Open a card's ⋯ menu to Chat with Source, Rename Source, or Delete Source. When a summary needs attention, its retry action appears here too.
For bulk deletion, hover over a card and select its checkbox. Once any card is selected, the sidebar header shows the number selected and a delete button. Click X to leave selection mode.
Plan limits#
Your plan sets both the number of Sources in each Project and the maximum size of each uploaded file:
| Plan | Sources per Project | Maximum file size |
|---|---|---|
| Octavo | 3 | 5 MB |
| Quarto | 50 | 50 MB |
| Folio | Unlimited | 200 MB |
If a batch contains more files than will fit, Chaptora lets you add only the files that fit or go back.
Limitations#
- A website Source is a snapshot of the page text when you add it. To capture a newer version, delete the Source and add the URL again.
- A YouTube Source needs an available transcript.
- Pages that require a sign-in or block access may not be readable.
- Image Sources do not receive summaries or AI Overviews. Attach an image to an AI Sidebar message when you want the AI to inspect it directly.
- A Chat Source captures the conversation at the moment you save it. Later messages are not added to it — save again to create a new Source with the complete conversation so far.